 how-to
How to Identify Storm Damage on Your Roof
Table of Contents
- Before You Inspect: Safety First
- How to Identify Storm Damage on Your Roof: Step-by-Step
- Signs of Hail Damage on Shingles You Should Not Ignore
- The Hidden Damage Checklist: What Most Homeowners Miss
- Storm Damage vs. Normal Wear and Tear: How to Tell the Difference
- How to Document Roof Damage for Insurance Claims
- When to Call a Professional Roofer After a Storm
- Frequently Asked Questions
Last Updated: August 24, 2026
Before You Inspect: Safety First
The biggest mistake homeowners make after a major storm is rushing onto the roof before assessing whether it's safe. A damaged roof can have compromised decking, weakened ridge caps, or slippery wet surfaces that turn a quick inspection into an emergency.
The guidance below helps you assess your roof thoroughly and safely, whether you stay on the ground or decide a closer look is warranted.
What You Need Before You Start
Gather these items before you begin any inspection:
- Binoculars (essential for ground-level assessment)
- A smartphone or digital camera for documentation
- Sturdy, non-slip footwear if you plan to access the roof
- A ladder in good working condition
- Notepad or a notes app to log what you find
- Gloves and eye protection
Check weather conditions first. Wet or icy surfaces dramatically increase fall risk. According to the OSHA guidelines on working at heights, falls are among the leading causes of serious work-related injuries.
Ground-Level vs. Roof-Level Inspection
A ground-level inspection using binoculars catches the majority of visible storm damage, including missing shingles, granule loss, displaced flashing, and dented soft metals.
Roof-level inspection is appropriate only when you have roofing experience, the right footwear, and a properly secured ladder. If the roof pitch is steep or the surface is still wet, do not attempt it. When in doubt, call a professional.
How to Identify Storm Damage on Your Roof: Step-by-Step
Storm damage roof assessment follows a logical sequence. Start from the ground, work systematically from one side of the structure to the other, and document everything as you go.
Step 1: Check for Missing, Curling, or Cracked Shingles
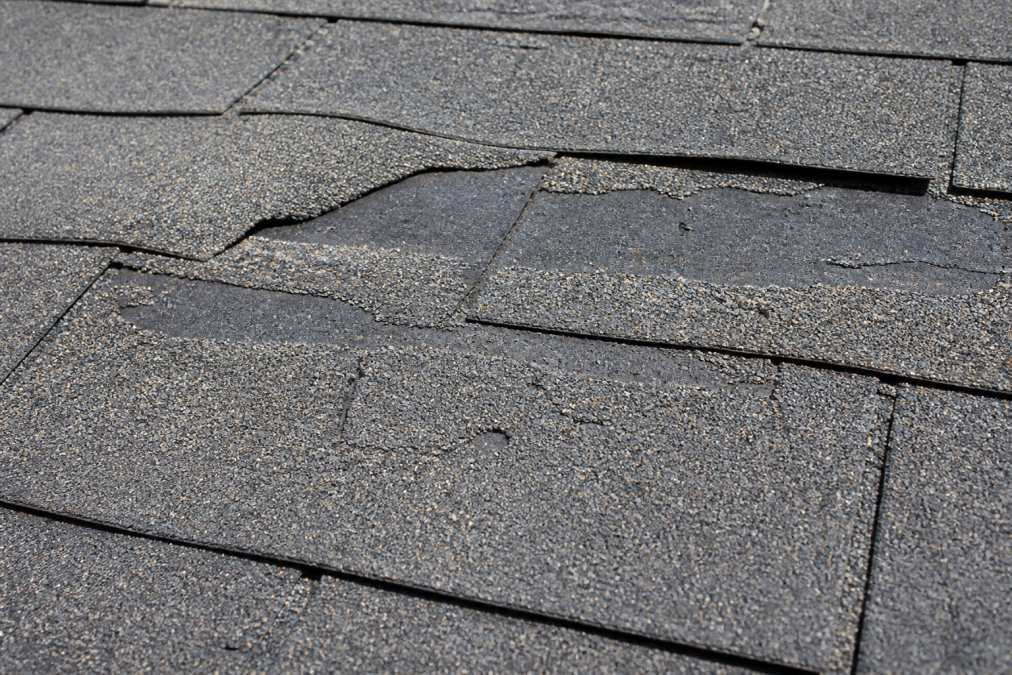
Missing shingles are the most obvious sign of wind damage. Look for bare patches where asphalt shingles have been lifted and displaced. Wind damage typically concentrates along roof edges, ridge lines, or areas where seal strips have failed.
Curling takes two forms: cupping, where shingle edges turn upward, and clawing, where the middle buckles while edges stay flat. Both indicate moisture stress or thermal shock. Cracking often signals age combined with storm impact. Uplifted shingles that appear intact but are no longer sealed flat are particularly dangerous, as the seal strips underneath have broken.
Step 2: Look for Granule Loss on Asphalt Shingles
Granule loss is one of the most reliable indicators of storm damage. Those granules protect the underlying asphalt from UV degradation and physical impact. When stripped away, the shingle's lifespan drops significantly.
From the ground, granule loss appears as dark, patchy areas where exposed asphalt shows through. After a storm, check your gutters and downspouts. A significant accumulation of granules in gutter channels is a clear sign your shingles took a hit. New roofs shed some granules during the first few months after installation, which is normal. Heavy, concentrated granule loss following a storm event is not.
Step 3: Inspect Flashing, Ridge Caps, and Drip Edges
Flashing is the thin metal material installed around chimneys, skylights, vents, and roof valleys. Look for bent, lifted, or separated flashing. Even small gaps create direct pathways for water intrusion.
Ridge caps sit at the peak of the roof and take the full force of wind. Missing or cracked ridge cap shingles are common post-storm findings and should be addressed promptly. The drip edge, which runs along the roof's perimeter, can be bent or displaced by high winds, compromising the moisture barrier.
Step 4: Examine Gutters, Downspouts, and Soft Metals
Soft metals tell the story of a storm better than almost anything else. Aluminum gutters, downspouts, vents, and HVAC flashing dent on impact from hail. These dents are measurable evidence of hail size and intensity.
Walk the perimeter of your home and examine gutters for dents and separation from the fascia, downspouts for impact marks and debris blockage, roof vents and exhaust caps for visible denting, and window sills, AC units, and mailboxes for corroborating hail dents. If your gutters and downspouts show consistent denting patterns, your shingles almost certainly absorbed the same impact.
Step 5: Check the Attic for Water Intrusion and Moisture
The attic is where storm damage becomes undeniable. After any significant storm, inspect the attic with a flashlight during or shortly after a rain event. Look for active drips or wet spots on the decking, dark staining on rafters and sheathing, soft or spongy areas in the decking, daylight visible through the roof deck, and mold or mildew growth.
Poor attic ventilation compounds water damage. When warm, moist air cannot escape, condensation builds up on the underside of the roof deck and mimics water intrusion from above. Distinguishing between the two matters for both repair and insurance purposes.
Signs of Hail Damage on Shingles You Should Not Ignore
Hail damage on shingles is often subtle, and that subtlety is exactly why many homeowners miss it until the roof starts leaking.
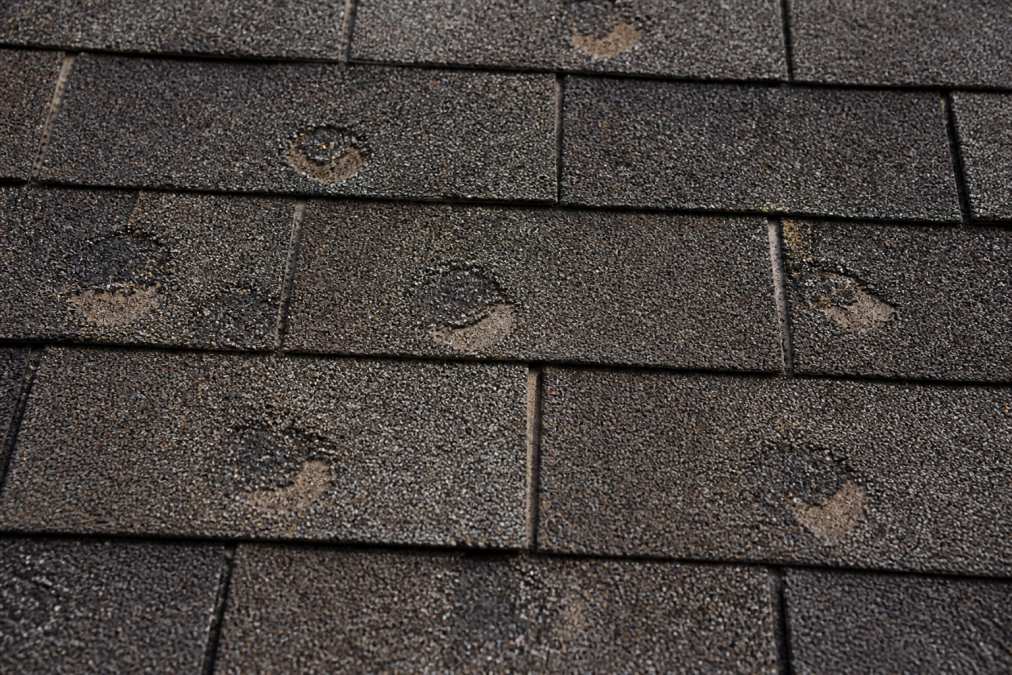
Hail impact marks appear as soft, random bruising on the shingle surface. Press your thumb gently into a suspected impact point: if the area feels soft or spongy compared to the surrounding shingle, the asphalt mat underneath has been compromised. This is called a bruised shingle, and it will crack and fail prematurely.
The pattern of hail damage is typically random across the roof surface, which distinguishes it from manufacturing defects or wear-related cracking. Look for circular or oblong impact marks with granule loss radiating outward, exposed black substrate where the granule layer has been stripped, cracked or split shingles from large hailstones, and dented metal components throughout the roof system.
As the Insurance Information Institute's guidance on hail damage notes, hail damage is one of the most common reasons homeowners file property insurance claims. Getting a professional assessment after any hail event is worth the time.
The Hidden Damage Checklist: What Most Homeowners Miss
Most storm damage checklists stop at shingles and gutters. Here is what commonly gets overlooked:
| Hidden Damage Area | What to Look For | Why It Matters |
|---|---|---|
| Soffit and fascia | Dents, cracks, rot-softened wood | Entry point for pests and moisture |
| Underlayment | Visible through missing shingles | Last moisture barrier before decking |
| Seal strips | Shingles flat but no longer bonded | Invisible wind vulnerability |
| Chimney mortar | Cracking or spalling around crown | Water infiltration into chimney flue |
| Skylight seals | Lifted or cracked perimeter seal | Direct leak path into living space |
| Ceiling stains indoors | Yellow or brown rings on drywall | Confirms active or past water intrusion |
| Attic ventilation | Blocked or dented ridge vents | Moisture buildup accelerates decay |
Ceiling stains deserve special attention. Water does not always drip directly below the roof entry point. Water travels along rafters and decking before dripping down, which means the visible stain can be several feet from the actual leak source.
Storm Damage vs. Normal Wear and Tear: How to Tell the Difference
This distinction matters enormously for insurance claims. Insurers cover sudden, storm-related damage, not gradual deterioration from age or lack of maintenance.
Storm damage characteristics:
- Damage is concentrated and directional, matching the storm's wind or hail path
- Multiple components failed simultaneously (shingles, gutters, flashing, soft metals)
- Neighbors in the same storm path show similar damage
- Damage appeared or worsened after a specific weather event
Normal wear and tear characteristics:
- Granule loss is uniform across the entire roof surface
- Cracking and blistering follow consistent patterns
- No corroborating damage to gutters, vents, or soft metals
- The roof is at or near the end of its expected service life
A common mistake is assuming that because a roof is old, storm damage is automatically classified as wear and tear. Age and storm damage can coexist. A 15-year-old roof can sustain legitimate hail damage, and that damage is still insurable. The key is documenting the event, the timeline, and the specific impact evidence.
How to Document Roof Damage for Insurance Claims
Knowing how to document roof damage for insurance is as important as identifying the damage itself. Weak documentation is the primary reason legitimate claims get undervalued or denied.
What to Photograph and Record
Start documenting before any repairs are made. Insurance adjusters need to see the damage in its original post-storm condition.
Photograph:
- Wide-angle shots of each roof slope showing overall condition
- Close-up shots of every damaged shingle, showing impact marks and granule loss
- All soft metal damage: gutters, vents, downspouts, flashing
- Interior ceiling stains and attic moisture, with timestamps
- Corroborating damage to other property: fences, AC units, vehicles
Record:
- The date and time of the storm
- Weather service data confirming the event
- A written description of each damage area with approximate location on the roof
- Any temporary repairs you made, with receipts
Create a written log alongside your photos. Note the date you discovered each item and any changes you observe over time. This timeline protects you if the insurer questions when the damage occurred.
If the Adjuster Says It's Just Wear and Tear
An adjuster's first assessment is not the final word. You have the right to request a re-inspection, provide additional documentation, or bring in a licensed public adjuster.
A roofing contractor experienced in insurance claims can provide a written damage assessment that contradicts the adjuster's finding. This documentation, combined with weather data and photographic evidence, forms the basis of a legitimate dispute. Many claims that were initially denied or underpaid have been successfully reopened with the right supporting evidence.
When to Call a Professional Roofer After a Storm
Calling a professional roofer after a storm is the right move whenever the damage is more than cosmetic, you cannot safely inspect the roof yourself, or you are planning to file an insurance claim.
Specifically, contact a professional if you observe missing shingles or exposed roof decking, active water intrusion into the attic or living space, significant granule accumulation in gutters after a single storm, dented or displaced flashing around chimneys or skyllights, or any structural concern, including sagging or soft areas on the roof deck.
Timing matters. Most insurers require damage to be reported and professionally assessed within a reasonable period after the storm event. A professional assessment provides written documentation that carries more weight with an insurance adjuster than homeowner photos alone.
The National Roofing Contractors Association's consumer guidance recommends having a qualified roofing professional inspect your roof after any significant storm, even if visible damage appears minor.
Leitch Roofing provides professional storm damage assessments for both residential and commercial properties, with specific expertise in insurance claim documentation. If you have been through a storm and are not sure what you are dealing with, a professional set of eyes on your roof is the most reliable next step.
Identifying storm damage on your roof accurately is the foundation of every successful insurance claim and every lasting repair. The most consequential damage, compromised underlayment, failed seal strips, and moisture-saturated decking, is often invisible without a trained assessment. Leitch Roofing's skilled crews inspect roofs thoroughly, document findings in detail, and provide the insurance claim assistance needed to ensure legitimate damage is recognized and properly covered. Get a free estimate today and find out exactly what your roof is dealing with.
Frequently Asked Questions
Q: How can I tell if my roof has storm damage?
A: Start from the ground with binoculars. Look for missing or uplifted shingles, visible curling or cracking, and dark patches where granules have worn away. Inside, check your attic for daylight, damp insulation, or ceiling stains. In your gutters, a buildup of granule debris after a storm is a reliable sign that asphalt shingles took a hit. If any of these signs appear, a professional roof inspection will confirm the extent of the storm damage.
Q: Can 1-inch hail damage a roof?
A: Yes. Hailstones 1 inch in diameter (roughly the size of a quarter) carry enough force to knock granules off asphalt shingles, dent soft metals like flashing and vents, and crack older or brittle shingles. The damage may not cause an immediate leak, but the loss of granules accelerates UV degradation and shortens the roof's lifespan. Most insurance adjusters treat 1-inch hail as a qualifying storm event, so document any impact marks and file promptly.
Q: How do I document roof damage for an insurance claim?
A: Before touching anything, photograph the entire roof from multiple angles, then capture close-ups of every damaged shingle, dented vent, cracked flashing, and stained ceiling. Record the storm date and note any local weather reports confirming hail or high winds. Keep all photos timestamped. A written estimate from a licensed roofing contractor strengthens your claim significantly. If the adjuster's initial finding is wear and tear, a contractor experienced with insurance claims can review the report and provide a second opinion.
Q: Does homeowners insurance cover storm damage to a roof?
A: Most standard homeowners insurance policies cover sudden storm damage caused by wind, hail, and falling debris. Coverage typically does not apply to damage resulting from lack of maintenance or gradual deterioration. The key distinction an adjuster evaluates is whether the damage has a clear storm-related cause. Policies vary, so review your declarations page for exclusions, deductible amounts, and whether the policy pays actual cash value or replacement cost value for the roof.