 how-to
How to Identify Roof Leak Sources: A Step-by-Step Guide
Table of Contents
- What You'll Need Before Starting Your Inspection
- How to Identify Roof Leak Sources: Start in the Attic
- How to Find a Roof Leak with No Attic Access
- Common Causes of Roof Leaks You Should Check First
- Roof Leak Detection Methods: The Controlled Water Test
- Trace Water Travel: Why Leaks Appear Far from the Source
- Rule Out Non-Roof Sources of Water Intrusion
- Common Mistakes to Avoid During Your Inspection
- Frequently Asked Questions
Last Updated: October 7, 2026
What You'll Need Before Starting Your Inspection
Before climbing into your attic or onto your roof, gather the right tools. You'll need a flashlight or headlamp for dark corners and a moisture meter if you have one, since it detects dampness your eyes might miss.
Keep a notepad and phone camera ready to record findings for insurance claims, and wear sturdy shoes with good grip, as wet roofing materials are slippery.
In the attic, stay on the beams. Attic floors aren't always solid, and one wrong step through drywall creates a bigger problem than the leak you're investigating.
Essential inspection tools:
- Flashlight or headlamp
- Moisture meter (optional but helpful)
- Work gloves and dust mask
- Notepad and pen
- Phone camera
- Sturdy shoes with grip
How to Identify Roof Leak Sources: Start in the Attic
The attic is where roof leaks tell their story. Water travels down from the roof and collects here before dripping into your living spaces, so starting here points you toward the actual leak source.
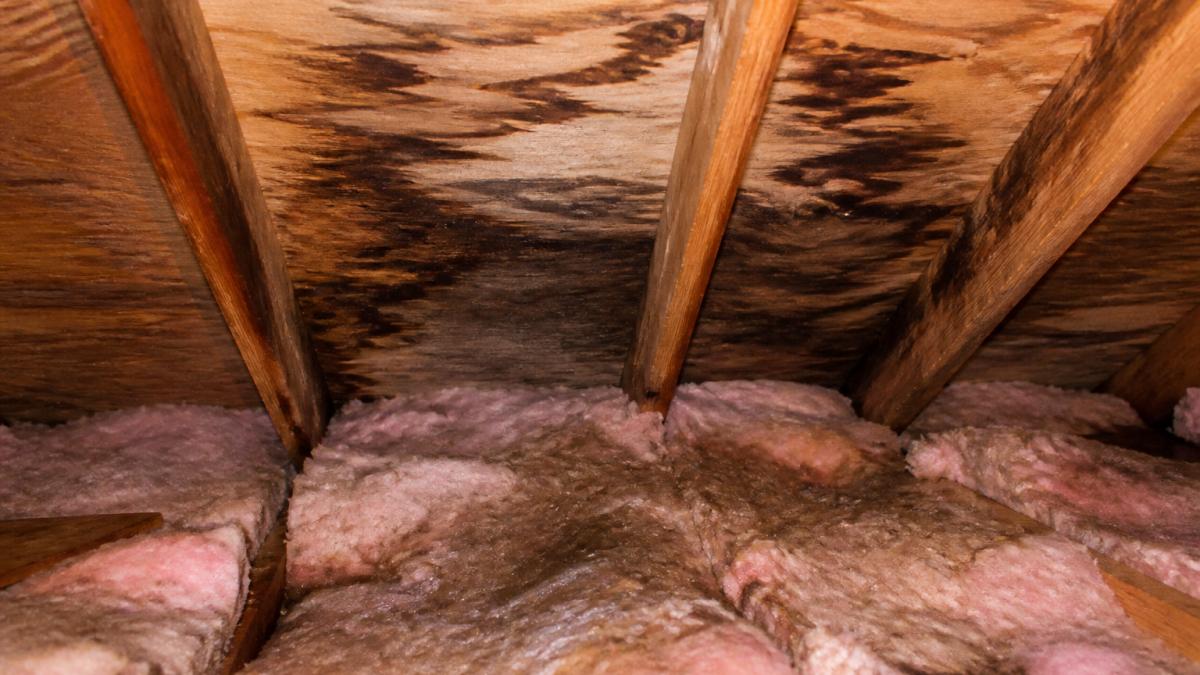
Look for water stains and dampness on rafters and insulation
Water stains on rafters are the clearest sign of a roof leak, appearing as dark streaks or discolored patches. Fresh stains look wet; old stains are dry but still visible.
Insulation absorbs water like a sponge, becoming matted and discolored. Run your hand over it carefully: wet insulation feels heavy and cold compared to dry insulation.
The water stain won't always be directly under the leak opening. Water travels along rafters and roof decking before it drips. Follow the stain upward toward the roof. This shows you the water's path.
What to look for in the attic:
- Dark streaks or discolored patches on wood rafters
- Wet or matted insulation
- Water pooling on the attic floor
- Damp spots on the roof deck
- Rust stains on metal fasteners or flashing
Check for mold growth and soft wood
Mold grows where moisture lingers, appearing as black, green, or white fuzzy patches on wood or insulation. A musty odor means mold is likely present.
Soft wood is a serious sign. Press your finger into the wood. If it dents easily or feels spongy, water damage has weakened the structure. This means the leak has been active for weeks or months. Soft wood needs repair, it won't hold fasteners or support weight properly.
Don't touch mold with bare hands. If it covers more than a few square feet, call a professional, since extensive mold means widespread damage.
Signs of water damage in the attic:
- Black or green mold on wood or insulation
- Musty smell
- Soft, spongy wood that dents easily
- Rust on metal components
- Sagging roof deck
How to Find a Roof Leak with No Attic Access
Not every home has an accessible attic. Condos, some townhouses, and homes with cathedral ceilings make attic inspection impossible. You'll need a different approach.
Start inside the home where water appears.
Water doesn't fall straight down. It travels along framing members and roof structure before dripping. A ceiling stain in a corner might mean the leak is several feet away on the roof.
Go outside and look at the roof from the ground, using binoculars if it's high.
If you can safely access the roof, inspect it directly for damaged shingles, flashing problems, and roof penetrations.
Finding leaks without attic access:
- Locate interior water stains
- Estimate the leak's position on the roof
- Inspect the roof from the ground with binoculars
- Look for visible damage above the stain
- Consider a professional roof inspection if you can't access the roof safely
Common Causes of Roof Leaks You Should Check First
Most roof leaks come from the same handful of problems. Checking these common causes first narrows your search.
Missing or damaged shingles
Shingles are your roof's first defense against water. When missing or damaged, water gets under the roof covering and into the structure below.
Look for shingles that are cracked, curled, or torn; missing shingles leave bare spots. Hail, wind, and age damage shingles, storms blow them off, and over time they curl at the edges and become brittle.
Damaged shingles don't always cause immediate leaks, but they compromise the roof's protection. Water finds cracks and gaps, and once under the shingles it spreads along the roof deck.
Check the roof systematically, starting at the lowest point and working upward.
Shingle damage to watch for:
- Cracks or splits in the shingle surface
- Curled or lifted shingle edges
- Missing shingles (bare spots)
- Bald patches where granules have worn away
- Shingles darker than surrounding ones (sign of water damage)
Flashing failures around vents, chimneys, and skylights
Flashing is metal or rubber material that seals gaps where roof penetrations break through the roof covering. Vents, chimneys, and skylights all need flashing.
Flashing can separate from the roof, rust, or crack. Sealant around flashing dries out and fails. When flashing no longer seals the gap, water runs down the side of the penetration and into your home.
Inspect every roof penetration and its flashing. Is the sealant cracked or missing? Is the flashing bent, separated, rusty, or corroded?
Chimney flashing is especially prone to failure. Chimneys expand and contract with temperature changes, stressing the flashing until the connection fails.
Flashing problems to identify:
- Cracks in sealant around flashing
- Flashing separated from the roof
- Rust or corrosion on metal flashing
- Gaps between flashing and the penetration
- Cracked or missing rubber flashing around vents
Roof valleys and gutter problems
Roof valleys are the V-shaped seams where two roof slopes meet, channeling water downward. When valleys fail, water pools and penetrates the roof covering.
Valleys accumulate debris. Leaves, twigs, and dirt clog them, so water backs up instead of flowing downward and eventually leaks through.
Gutters and downspouts carry water away from the roof edge.
Check your gutters for leaves and debris, and watch for water overflowing the edges during rain. Check the valleys too: are they clear, or is there standing water or wet spots?
Gutter and valley issues:
- Clogged gutters full of leaves and debris
- Water overflowing gutter edges
- Debris blocking roof valleys
- Standing water in valleys
- Sagging gutters pulling away from the roof edge
- Downspouts directing water toward the foundation
Roof Leak Detection Methods: The Controlled Water Test
A controlled water test helps pinpoint the exact leak location. You'll need a garden hose and a helper. This method works best on clear, dry days when you can see water movement.
Start at the lowest point of suspected leakage.
Work your way up the roof systematically, spraying at the base of roof penetrations first, then along valleys and roof edges.
This test requires patience, since water moves slowly through roofing materials and framing. Keep the hose in one spot for several minutes before moving.
Mark the leak location with chalk or a bright marker. This helps when you're ready to repair.
Controlled water test steps:
- Start at the lowest point of suspected damage
- Spray water slowly for 10-15 minutes in one area
- Have a helper watch for drips inside
- Move upward gradually
- Test roof penetrations, valleys, and edges
- Mark the leak location when found
Trace Water Travel: Why Leaks Appear Far from the Source
Water doesn't always drip straight down. It travels along wood framing, roof decking, and insulation before it appears in your home.
Water enters through a hole or gap in the roof, runs along the underside of roof decking, and follows the slope downward.
A ceiling stain in one room might come from a leak several feet away on the roof. The water traveled along rafters and roof structure before dripping through the ceiling.
Trace the water's path by following the grain and slope of wood members and studying how the roof is framed.
How water travels before appearing indoors:
- Enters through a roof opening or gap
- Runs along the underside of roof decking
- Follows the slope downward
- Runs along rafters and framing members
- Pools in low spots
- Eventually drips through ceiling openings or weak spots
- Can travel 10-20 feet before appearing indoors
Rule Out Non-Roof Sources of Water Intrusion
Not every interior water stain comes from a roof leak.
Condensation forms on cold surfaces when warm, humid air meets them, appearing on rafters and insulation especially in winter.
Plumbing leaks create water stains on ceilings and walls. Trace the stain to the room above.
Exterior wall leaks occur around windows, doors, and siding. Water enters through gaps in caulk or flashing.
HVAC condensation from air conditioning drains can create wet spots. Check if your AC system's drain line is clogged or disconnected.
Distinguishing these sources prevents expensive, unnecessary repairs. A roof repair won't fix a plumbing leak.
Non-roof sources of water stains:
- Attic condensation (cold season, appears on rafters)
- Plumbing leaks (stains in bathrooms or kitchens)
- Window or door leaks (stains around openings)
- HVAC condensation (wet spots near air handlers)
- Exterior wall leaks (water entering through siding or caulk gaps)
Common Mistakes to Avoid During Your Inspection
Homeowners often make mistakes when investigating roof leaks, delaying the actual problem or leading to misdiagnosis.
Don't assume the leak is directly above the interior stain. Water travels.
Don't ignore small damage. A small hole or crack in flashing becomes a big problem.
Don't skip the gutters. Clogged gutters cause more leaks than people realize.
Don't walk on a wet roof. You'll slip and fall. Wait for dry conditions.
Don't assume all water stains are recent.
Don't delay repairs. Active roof leaks cause structural damage. Water weakens wood.
Inspection mistakes to avoid:
- Assuming the leak is directly above the interior stain
- Ignoring small damage
- Skipping gutter inspection and cleaning
- Walking on wet roofs
- Confusing old stains with active leaks
- Delaying repairs after finding damage
Finding a roof leak requires patience and systematic inspection.
At Leitch Roofing, we help homeowners and property owners identify and repair roof leaks quickly. Whether you're dealing with storm damage, aging shingles, or mysterious water stains, we can help you find the source and fix it right. The National Roofing Contractors Association provides guidance on roof maintenance and inspection to help homeowners understand their responsibilities. If you've identified a leak and need professional help, get a free estimate from Leitch Roofing today.
| Inspection Step | What to Look For | Location |
|---|---|---|
| Attic inspection | Water stains, dampness, mold | Rafters, insulation, roof deck |
| Shingle check | Missing, cracked, or curled shingles | Entire roof surface |
| Flashing inspection | Separated, rusted, or cracked flashing | Vents, chimneys, skylights |
| Valley inspection | Debris, standing water, damage | Roof valleys and seams |
| Gutter check | Clogs, overflow, sagging gutters | Gutters and downspouts |
| Water test | Drips appearing indoors | Starting from low point upward |
The U.S. Environmental Protection Agency offers guidance on moisture control and mold prevention in homes to help you understand how to prevent water damage after identifying a leak.
Frequently Asked Questions
Can a roof leak show up far from its source?
Yes. Water travels along rafters, interior framing, and insulation before pooling and dripping through the ceiling. A leak visible in your bedroom may originate from flashing or a damaged shingle several feet away. This is why tracing water stains backward to the roof deck is critical during inspection. Always follow the water trail upward, not just directly above the stain.
What should you check first when looking for a roof leak?
Start in the attic if you have access. Look for water stains on the roof deck, rafters, and insulation, and check for mold or dampness. Then move to the exterior to inspect common failure points: missing shingles, flashing around vents and chimneys, roof valleys, and gutters. These areas account for the majority of roof leaks and are easiest to spot from outside.
How can you tell if a water stain is from a roof leak?
Roof leak stains are typically brown, yellow, or dark and may have soft or discolored insulation beneath them. They often follow a water trail upward along rafters or framing. Non-roof sources like plumbing leaks or condensation tend to stain in isolated spots without a clear path to the roof. If the stain is near a roof penetration such as a vent or chimney, a roof leak is more likely.
I can't find the source of my roof leak. What should I do?
If your inspection doesn't reveal an obvious source, consider hiring a professional roofer who can perform a controlled hose test or use thermal imaging to detect moisture. They can also rule out non-roof sources such as plumbing or HVAC condensation. Document all visible water damage with photos and notes before calling; this helps professionals narrow the search and supports insurance claims.