 how-to
How to Identify Hail Damage on Roof Shingles
Table of Contents
- What Does Hail Damage Look Like on Shingles
- Signs of Storm Damage on Asphalt Shingles
- How to Perform a Safe Roof Inspection
- Hail Damage Roof Inspection Checklist
- Differentiating Hail Damage from Normal Wear and Tear
- How to File a Roof Insurance Claim for Hail
- When to Call a Professional Inspector
- Frequently Asked Questions
Last Updated: October 4, 2026
What Does Hail Damage Look Like on Shingles
Understanding how to identify hail damage on roof shingles is essential, as it appears as localized impact marks that differ from normal wear and tear. We help homeowners recognize these signs early so they can file insurance claims before further deterioration occurs. The damage typically shows up as bruising, divots, granule loss, and soft spots across the affected area.
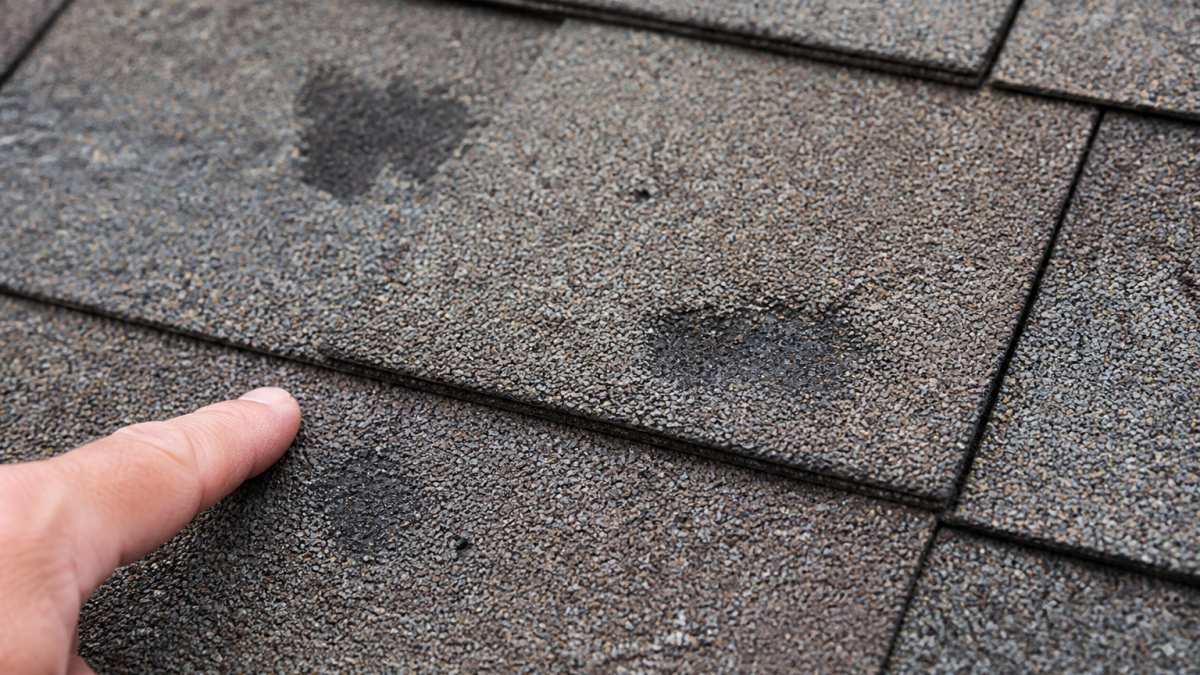
Early identification of hail damage lets you document it quickly for your insurance claim before further deterioration occurs.
Bruising and Divots
Hail strikes create visible bruising on asphalt shingles, circular or oval indentations that appear darker than surrounding areas because the impact compresses the asphalt.
Divots are small pits or gouges where hail removed material from the shingle surface, breaking through the protective coating and appearing as tiny craters scattered randomly across multiple shingles.
Bruising stays on the surface; divots penetrate it. Both allow water infiltration and matter for insurance claims.
Granule Loss and Exposed Fiberglass
Granules coat asphalt shingles to protect them from UV damage. Hail strips them away, revealing lighter fiberglass mat underneath.
Without granules, shingles deteriorate faster. You may find dark sand-like granules in gutters after a hailstorm.
Exposed fiberglass compromises structural integrity and allows water penetration, functional damage that affects roof performance.
Shingle Matting and Soft Spots
Hail can mat down fiberglass fibers, creating flat, compressed areas that feel smoother than surrounding shingles.
Soft spots indicate asphalt damage. If a shingle feels spongy when pressed gently, hail has likely compromised it.
Signs of Storm Damage on Asphalt Shingles
Storm damage extends beyond the roof itself. Hail impacts multiple surfaces on your home, and recognizing all of them strengthens your insurance claim.
Functional vs. Cosmetic Damage
Functional damage (granule loss, exposed fiberglass, soft spots, divots) allows water infiltration and is typically covered by insurance. Cosmetic damage (surface bruising, discoloration) affects appearance only and may not be covered. Emphasize functional damage in your claim, as adjusters use it to approve coverage.
Collateral Indicators Beyond the Roof
Hail damages gutters, downspouts, siding, AC units, and vents. Dents in gutters, dings in siding, and cracked AC fins support your roof claim by showing hail's strength. Document all damage with wide and close-up photos.
How to Perform a Safe Roof Inspection
DIY roof inspection provides documentation for insurance claims, but safety is critical, falls cause over 300,000 emergency room visits annually. Assess whether DIY inspection is appropriate before climbing.
Should You Inspect Your Roof Yourself? A Decision Framework
Not every homeowner should climb onto their roof. Use this framework to decide:
Climb yourself only if ALL of these are true:
- Your roof pitch is 6/12 or less
- You have a 20-foot or shorter ladder
- Weather is clear, dry, and calm (no wind above 10 mph)
- You are physically able to balance on a sloped surface
- You have a second person to spot you
- Your roof is less than 15 years old
Hire a professional if ANY of these apply:
- Your roof pitch exceeds 6/12 (steeper roofs require specialized equipment)
- You are over 65, have balance issues, or any condition affecting mobility
- Your roof is wet, icy, or has been wet within the last 24 hours
- You are uncomfortable with heights or have never climbed a ladder onto a roof
- Your roof is flat or has skylights, vents, or other obstacles
- You have no one available to spot you
If any "hire a professional" criteria apply, skip DIY inspection. Professional inspections are often far cheaper than emergency care or fall-related repairs.
Ground-Level Assessment (Safe for Everyone)
Start from the ground with binoculars, smartphone, and notepad. Stand facing each roof side (north, south, east, west) for 2-3 minutes each. Scan for bruising, divots, and granule loss. Take photos of suspicious areas and note locations. Check gutters, downspouts, and AC unit for dents. Ground-level photos often suffice for insurance claims, especially with collateral damage documentation.
Safe Roof Climbing Protocol (If You Meet All Criteria Above)
If DIY inspection is appropriate, follow this protocol:
Before climbing: Check weather (no rain forecast within 4 hours). Wear non-slip shoes, safety harness anchored to ridge vent or chimney, hard hat, long pants, and gloves. Have a spotter hold the ladder.
On the roof: Move slowly, maintain three points of contact, stay 6 feet from edges, walk on roof deck only, and limit time to 10-15 minutes.
Descending: Back toward the ladder, place one foot on rung before releasing hands, descend slowly with spotter guidance.
After: Sit briefly and review photos while details are fresh.
What to Look for During Inspection
When learning how to identify hail damage on roof shingles, look for bruising, divots, missing granules, exposed fiberglass, soft shingles, dents in flashing, damaged vents, and cracked shingles. Take wide and close-up photos with timestamps.
Hail Damage Roof Inspection Checklist
Use this checklist: Check south and west-facing sides first. Look for bruising, divots, granule loss in gutters, flashing dents, AC damage, siding marks. Take timestamped photos. Note weather conditions and hail size. Document interior water stains. This captures evidence adjusters need to approve claims.
Differentiating Hail Damage from Normal Wear and Tear
Not every roof mark is hail damage. Age, weather, manufacturing defects, and poor installation create similar-looking damage that insurance won't cover. Misidentifying damage type leads to denied claims.
Hail vs. Blistering and Thermal Cracking: Visual Comparison
Hail Damage
- Appearance: Discrete, localized impact marks scattered randomly across shingles. Bruises appear as dark, compressed areas; divots appear as small craters or gouges.
- Shape: Circular or oval indentations. Marks are roughly uniform in size within a given hail event.
- Pattern: Random distribution across a broad area of the roof. Damage is concentrated on south and west-facing sides (the direction the storm moved).
- Edges: Sharp, defined edges around impact marks. The asphalt around the impact is visibly compressed.
- Timing: Damage appears suddenly after a hailstorm, correlating with a specific weather event.
- Collateral damage: Dents on gutters, siding, AC units, and vents appear in the same timeframe, supporting the hail diagnosis.
- Insurance coverage: Typically covered if damage is functional (allows water infiltration).
Blistering (Manufacturing or Installation Defect)
- Appearance: Raised bubbles or blisters on the shingle surface, often in clusters. The blister looks like a bubble under the asphalt coating.
- Shape: Round or oval, but the surface is raised, not indented. The blister may be soft to the touch or cracked open.
- Pattern: Often appears in clusters on certain sections of the roof, not randomly scattered. May be concentrated on south-facing areas (heat-related).
- Edges: Soft, rounded edges. The blister is a raised area, not a depression.
- Timing: Develops gradually over months or years, not suddenly after a storm. Often appears within the first few years of installation.
- Cause: Moisture trapped under the shingle during manufacturing or installation. Heat causes the moisture to expand, creating the blister.
- Collateral damage: No dents on gutters or siding. Damage is isolated to the roof.
- Insurance coverage: Not typically covered. Blistering is considered a manufacturing or installation defect, not weather damage.
Thermal Cracking (Age-Related Stress)
- Appearance: Cracks running across shingles in roughly parallel lines. Cracks may be single lines or multiple lines in the same area.
- Shape: Linear, not circular. Cracks often run in the direction of the roof pitch or perpendicular to it.
- Pattern: Widespread across the roof, not localized to one area. Affects multiple shingles in a general pattern.
- Edges: Sharp, defined cracks in the asphalt. The crack may expose the fiberglass mat underneath.
- Timing: Develops gradually over years as shingles expand and contract with temperature swings. More common in climates with large temperature variations.
- Cause: Thermal stress from daily heating and cooling cycles. Shingles expand in heat and contract in cold, eventually cracking.
- Collateral damage: No dents on gutters or siding. Damage is isolated to the roof.
- Insurance coverage: Not typically covered. Thermal cracking is considered normal wear and tear, not weather damage.
Quick Identification Tips:
- Hail = impact marks (indented, circular, random, sudden)
- Blistering = raised bubbles (soft, clustered, gradual)
- Thermal cracking = linear cracks (parallel lines, widespread, gradual)
Age-Related Deterioration
Old shingles naturally lose granules, curl, and become brittle over years, normal wear not covered by insurance. Age-related damage shows uniform granule loss, curled edges, UV fading, brittleness, and moss growth. Hail damage shows concentrated impact marks, sharp edges, correlation with storm date, and collateral damage on gutters and siding. Your roof's age affects adjuster evaluation, older roofs may have claims denied as age-related.
When to Call a Professional for Damage Identification
If unsure whether damage is hail-related, blistering, or thermal cracking, hire a professional inspector before filing. They distinguish damage types, assess functionality, provide written reports, and represent your interests with adjusters. Professional inspections cost $150-$300 and often result in higher payouts.
How to File a Roof Insurance Claim for Hail
Filing a claim requires documentation, timing, and clear communication with your insurance company.
Post-Storm Timeline and Documentation
Act quickly after a hailstorm. Document damage within 24-48 hours while it's fresh and before any additional weather occurs.
Your timeline should look like this:
- Day 1: Inspect from ground level, take photos
- Day 1-2: Contact your insurance company to report the damage
- Day 2-3: Schedule the adjuster's inspection
- Before adjuster visit: Compile all photos and documentation
- After adjuster visit: Follow up on their timeline for claim decision
Photos are your strongest evidence. Take them in good daylight with clear focus on damage areas. Include wide shots showing location and close-ups showing detail. Timestamp your photos if possible.
Document the hail event itself. Note the date, time, hail size if you observed it, and wind direction. This context helps the adjuster understand what happened.
Working with Your Insurance Adjuster
Prepare for the adjuster's visit with all photos ready. Point out damage areas, explain the damage pattern, show collateral damage, and ask questions. If the adjuster denies your claim, request a second opinion from a public adjuster or roofing contractor. We help clients navigate claims with professional inspections and reports supporting your position.
When to Call a Professional Inspector
Call a professional inspector if you're uncomfortable climbing, the roof is steep, you're unsure about damage type, the adjuster denies your claim, or you want a second opinion.
Hail damage demands quick action and clear documentation. If unsure about damage or wanting professional validation, Leitch Roofing offers free inspections and expert guidance. Get a free estimate today and let our team assess your roof damage.
Frequently Asked Questions
What does hail damage look like on asphalt shingles?
Hail damage appears as round or oval bruises, divots, and dents on shingle surfaces. You may also see missing granules exposing the dark fiberglass mat underneath, shingle matting where the surface has been flattened, and soft spots when pressed. Unlike normal wear, hail damage typically occurs in concentrated patterns across multiple shingles rather than scattered across the roof.
Can you see hail damage from the ground?
Some hail damage is visible from the ground, particularly larger dents, significant granule loss, and shingle matting. However, smaller bruising and divots are difficult to spot without climbing onto the roof or using binoculars. A ground-level inspection can identify obvious damage, but a closer roof inspection catches the impact patterns that matter for insurance claims.
How do I know if my roof needs to be replaced after a hail storm?
Your roof needs replacement if hail damage affects shingle integrity across large areas, causes widespread granule loss exposing fiberglass, creates soft spots or matting, or results in functional damage like leaks. Cosmetic damage alone may not warrant replacement. An insurance adjuster or professional inspector evaluates whether damage is sufficient to justify replacement versus repair based on hail size, impact density, and shingle age.
Does hail damage always cause leaks immediately?
No. Hail damage doesn't always cause immediate leaks. Cosmetic damage like bruising or granule loss may take months or years to compromise the roof's ability to shed water. However, damage that penetrates the shingle or underlayment can leak immediately. This is why documenting hail damage promptly for insurance claims is important, leaks may develop later even if the roof appears dry after the storm.